Art Bootcamp Notes · 06 · Seeing accurately
Using Blender as a Drawing Reference for Light, Shadow and Shape
Use free Blender as a low-budget studio: move a light, render the shadows, draw from it. And how a 3D cylinder fixed my concept-drawn shapes.
 By LIPAI WANG · Chapter 6 of his book Art Is a Puzzle You Can Solve
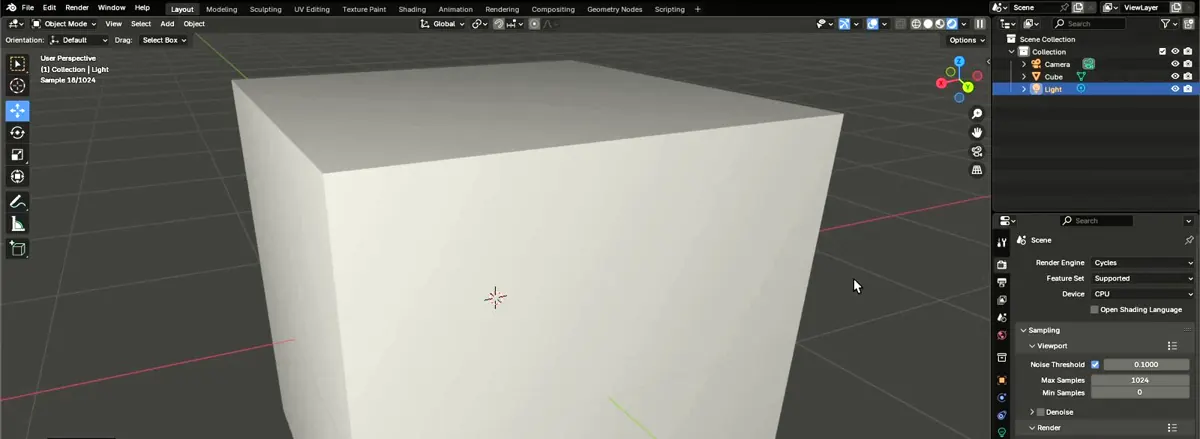
One of the great things about using Blender is that you don’t need to buy a model, and you can still observe and set up studio lights. It’s very, very low budget: everything is just inside your computer. You might look at the screen and think it doesn’t look like much. We’ve got a light, we’ve got a camera, we’ve got a grey cube. But here’s the thing: when you render it, it becomes reality.
This chapter is about using Blender as a reference for drawing. First I show you how to study light and shadow with it. Then I show you something I got wrong for a very long time, drawing basic shapes like the cube and the cylinder, and how a few Blender screenshots corrected it. At the end there is a shorter part on getting Blender ready: downloading it, keeping it up to date and what to expect when it updates, choosing a mouse, and installing (and uninstalling) the add-on I use so you can see every key I press.
Studying light and shadow
The traditional way of learning light is to go to a studio and learn how to set up the lights there. I teach the traditional ways too. But we already have this really powerful, modern technology, so I think it’s a good time to embrace it.
From the viewport to a render
Before anything else, I change my mouse. I normally use a Magic Mouse, but when I do something pretty serious, like using Blender, I use a typical mouse with two buttons and a scroll wheel. I explain why in “Why I don’t use a Magic Mouse” later in this chapter.
- Render the scene. Go to Render and choose to render the image, or press F12. A new window opens and you can watch it working. If your computer is rendering a really high-resolution image, you may hear the fan start up, and you know something is going on. When it finishes, you have basic light information and shadow information, all more fine-tuned than the viewport.
- Change the viewport shading. I want something more realistic while I work. At the top of the viewport is the viewport shading. The default is solid mode. You can change it to material preview or, even better, rendered preview. Material preview shows you the materials: if you had a glass window and a wooden floor, you would see them change. Rendered preview is the one I want.
- Watch it live. In rendered preview you see in the viewport, live, what you would otherwise wait a long time for.
- Move the light. Click the light to get hold of it. Switch to the Move tool, then click and drag. As you drag, you can see the light changing, up and down. How cool is that?
- Look around. Hold the middle mouse button and drag to see the scene from a different angle, from the side, even upside down. Blender has a lot of shortcuts; I won’t go through them all here.
Changing the render engine
We can make it even cooler. Open the render properties and change the render engine: use Cycles instead of Eevee. Different render engines use different algorithms, and they give you a different feeling. Cycles gives you a really high-resolution result and a really, really good lighting result. I love it. It can get a little glitchy when you move around.
Adding objects and a floor
You can add more models too.
- Press Shift+A to add, choose a mesh, and add a monkey.
- Press G to grab it and move it into place.
- Press numpad 0 to look through the default camera. This is what will be rendered if you render now.
- Go to the light, grab it with G, and just play around with it. Do some random lighting and confirm where the shadow areas are. You can even set up studio lighting, such as a three-point lighting system.
- Press Shift+A again and add a plane. Press S to scale it and make it bigger, so it becomes a floor.
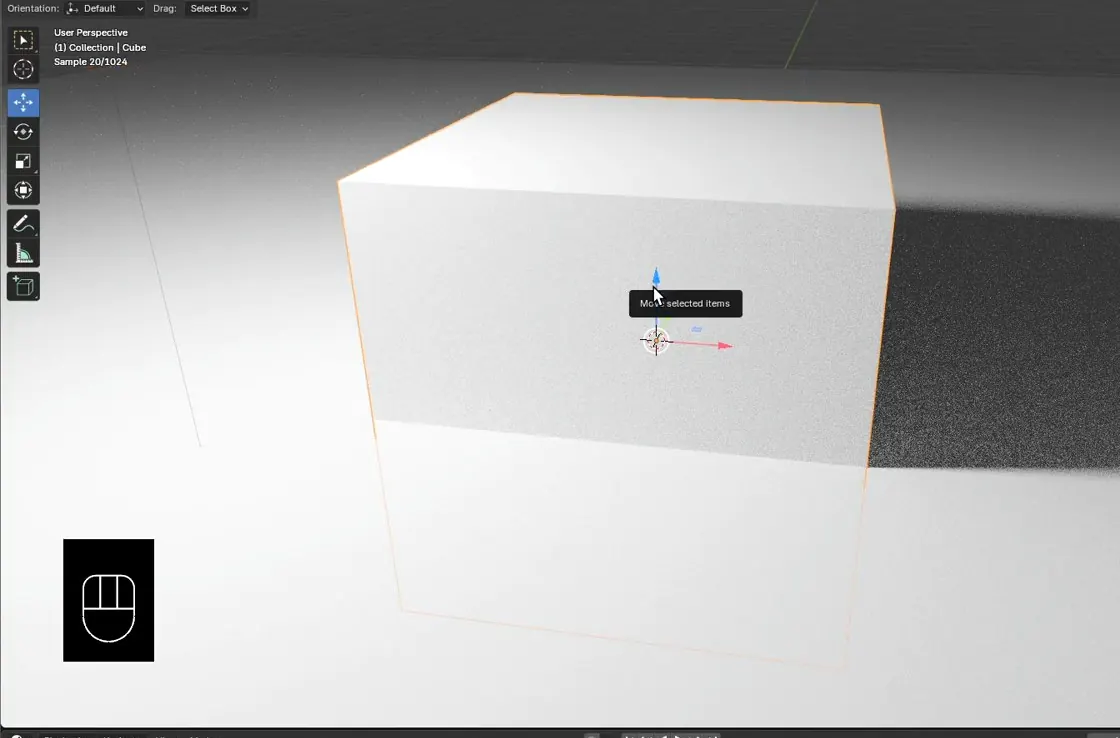
As soon as the floor is there, we get shadow, and that shadow falls on the surface below. The surface reflects light back, too. That’s amazing. You can see how good the render is, live.
Using it as a reference
You can learn a lot by using this as a reference. Say you want to draw something like this. Play around until you get a better feeling for the 3D space. When you are satisfied, wait for the render, or render it by pressing F12. Save that rendered image to your phone or your iPad. Then, if you are practising traditionally, take out the pencil, take out the pen, and draw from it. You have amazing light settings.
Try it. Set up a cube on a plane in rendered preview, grab the light with G and move it until you like the shadow. Render it with F12, put the image on your phone or iPad, and draw it in pencil.
Studying basic shapes
This is the area I failed at so many times: drawing a specific shape. You might think it’s easy, and you might be making the same mistake I made. I recently improved a lot just by figuring out this one concept, so it’s really important. You might think you know, but in fact you might not.
Drawing from concept
Say you are drawing a cube. You might draw it like this: these edges parallel with each other, the same length as each other, and then you’re just connecting the dots. It seems fine. It’s simple maths. But in Blender, that is the orthographic view. It’s not the perspective view. Normally, when we draw, we draw in perspective view. We are not going to draw something like this. It is a common mistake, and I think I made it for the past 20 or 30 years.
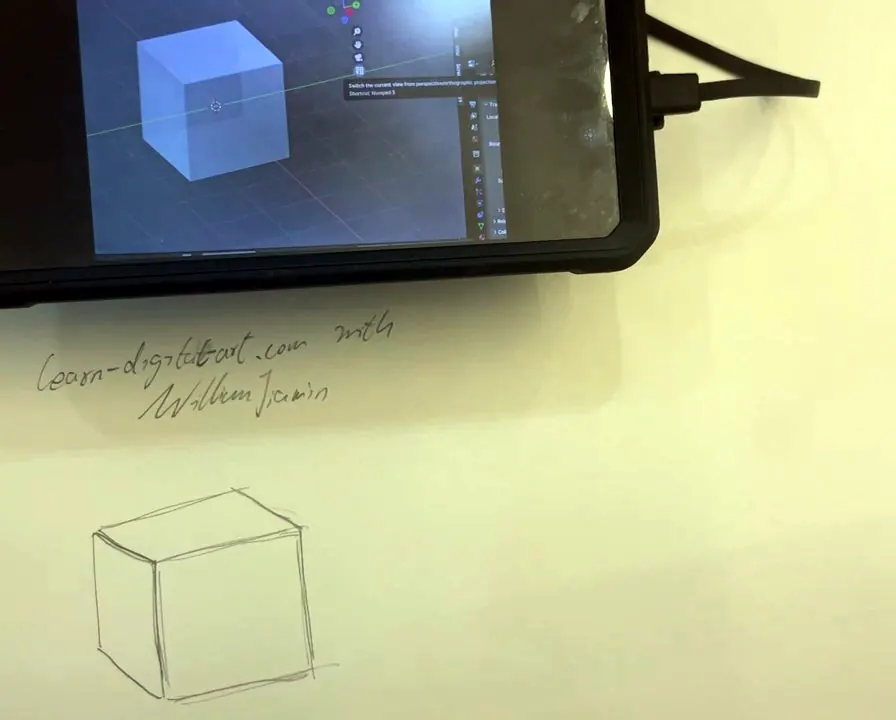
I had never really thought about it. When I started drawing, my drawings reflected what I thought was normal, but it wasn’t. So this is what I learned: the typical mistake I made was drawing from concept rather than drawing from observation. I know maths, so the cube was a combination of mathematics and a concept. We humans tend to conceptualise things and store them in our brain to save a little time and energy. So I was drawing a cube from a concept. You don’t store all the information in your brain. You store a concept, and then you draw it on the spot: parallel lines, maybe a few dotted lines to confirm. But it’s not the case.
If you switch Blender from the orthographic view to the perspective view, you get a very different cube. That is what we are supposed to draw.
Blender has been very, very helpful to me here. I tackle the art problem from different angles, and I think that has really increased the efficiency of my learning. I draw, traditionally and digitally, and I also sculpt. I didn’t have the place or the materials to sculpt traditionally, so I sculpt digitally. It’s a really powerful tool, and sculpting has taught me a little about anatomy too, even though I’m still pretty bad at sculpting. That’s another story.
The cylinder
I normally made the same mistake with a cylinder. I drew a circle at the top and a really similar circle at the bottom, then connected the dots with two parallel lines. In fact, it’s not like that. Look at it from above and the part closer to you should be bigger, and the part further away should be smaller and rounder. Connect the dots after that, maybe add some shadowy parts to show the volume, and it’s way better than the concept drawing.
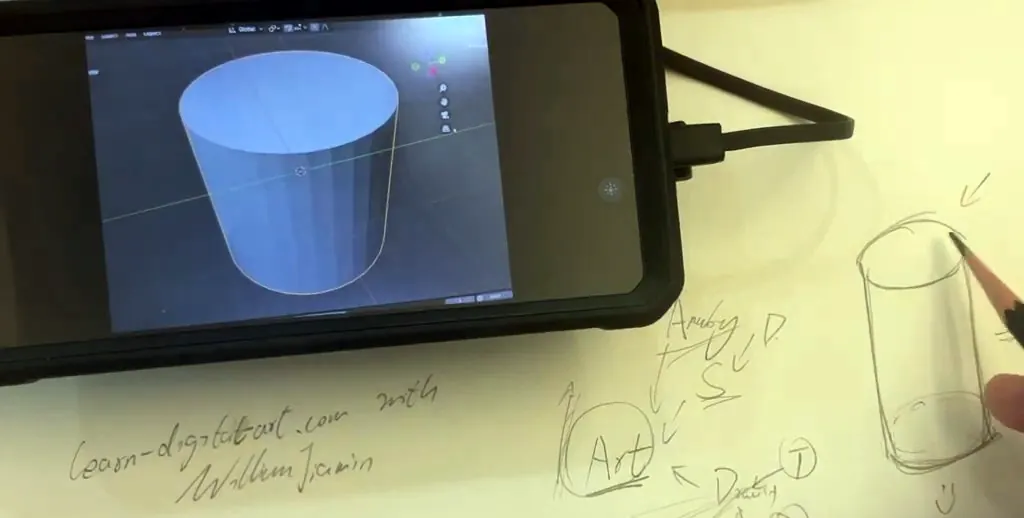
To show this properly, I recorded a Blender video of a very long cylinder, made long on purpose, and played it on my phone while I drew next to it.
- Look at the end. The end of the cylinder is not a circle. It is more like an ellipse. I often made the mistake of drawing the top and the bottom the same. They’re not.
- Cut through it. In Blender, make a loop cut: press Ctrl+R and use the centre wheel to add a lot of cuts. Not a crazy amount, because you don’t want them to overlap.
- Compare the cuts. Now you can see each cross-section. Near the top, the ellipse is squished down. Going down, it gets bigger and bigger, and more like a circle. The width changes constantly as well: the cylinder becomes narrower and narrower as you go down.
- Draw what you see. So the major lesson is: don’t draw this part and that part the same. You need to change them a little.
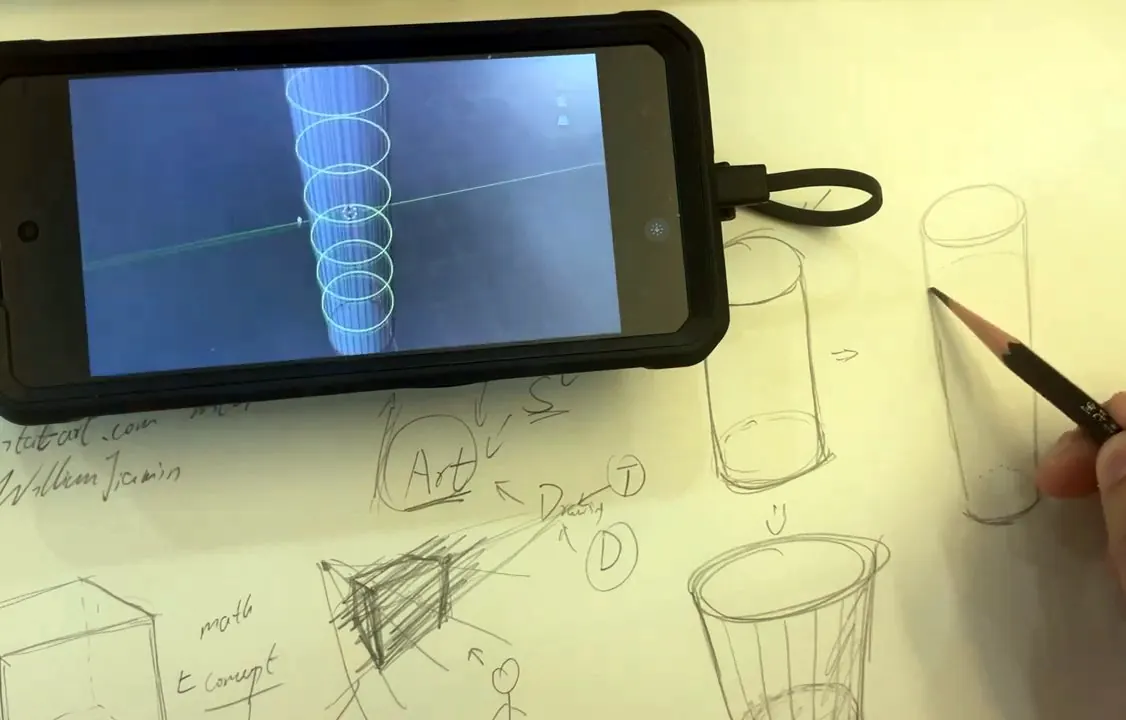
If you want more reference points, find the centre point of each ellipse and connect them all with a light tracing line. It helps you anchor the places. Study the circles inside the cylinder, even when the change isn’t drastic. With a really long cylinder seen from a steep top angle, the change is drastic: the ends closer to the bottom are rounder, and the ones further away are flatter ellipses.
One more thing I tend to do: don’t draw the ellipse too sharp at the sides. An ellipse is drawn as two curves that join, one and two, and sometimes I make the joining point a little sharp. It shouldn’t be. So I correct it by hand to make a rounder shape. In nature, a curve seen from almost any angle won’t become a really sharp shape. Even from a really drastic angle, you won’t get really sharp edges.
So there are two concepts to take away. One is the perspective view, the other is the orthographic view. And we need to learn from observation. If you actually observe the object, it’s not what you think. The cylinder you draw from concept looks like this; the one you observe looks like that, depending on the angle. Cut the cylinder and you get multiple circles, constantly changing. Study those circles, and practise more.
Try it. Put a long cylinder in Blender, add loop cuts with Ctrl+R, and look at it from above in perspective view. Draw it next to the screen, making each ellipse different, and keep the sides of every ellipse round, not sharp.
Getting Blender ready
When I was a kid, I loved modelling and sculpting, playing with all that dirty mud and sand. Luckily, now we can do that digitally. Especially if you are learning drawing or painting, traditional or digital, you can use the help of a tool like this to build an environment, to model things, to render things, or simply to learn light and shadow. And of course you can also use it to make amazing animation. That tool is Blender, and luckily it’s open source and free for you to use. We are living in a brilliant time.
If you want to work along with Blender, here is how I set it up.
Downloading Blender
The first thing, of course, is to download Blender. Go to blender.org and you can download it quickly. When I recorded this lesson I was using Blender 4.3, and you can use whatever version is the latest. Blender doesn’t change much along the way, so hopefully there won’t be a lot of differences. Most of the time it will be exactly the same.
Click download. It’s cross-platform, so it doesn’t matter whether you are using Linux, Windows or Mac. It’s free to download. They also run donation campaigns, on Twitter (it’s called X now), with a message along the lines of “Blender is free software, but it’s not actually free”, because it costs money to maintain and develop. It’s brilliant. For a rebellious mind like me, I prefer this kind of open-source, community-based software. It can be an alternative to some of the proprietary software the industry uses, which is pretty expensive. It’s lucky to have an alternative, especially for indie developers and indie art makers like me. I develop games and apps as well as making art.
Blender 5.0 and staying on one version
Blender is really, really actively maintained. It is constantly updated, adding more things and getting rid of things you’re not going to use. Let me share some of my experience. When I started these lessons it was Blender 4 point something, and by the time I finished, Blender 5.0 was here. So I have to keep updating things too.
That is what an update can do to you. Say something is done in 4.3, and you follow along in 4.8 or something like that, and then you update to 5.0: you might not be able to find that specific option any more. Where a major update changes how something is done, I show you the new way, as in “Uninstalling an add-on” later in this chapter.
While you are learning, I strongly recommend that you stick with one version from start to finish, because you don’t want to break your project. Blender also keeps long-term support versions: specific versions it maintains for longer. Then, later, you can follow the major updates of Blender to learn some new tricks.
But Blender always feels kind of the same. Updates mostly add new things. Maybe in a previous version you found a certain option here, and after an update you find it over there. It doesn’t really change that much. I think 80 or 90 per cent of the core functionality of Blender hasn’t changed for a pretty long time. So you can rest assured: most of what you learn is going to stick.
Using Steam to update Blender
You can also use third-party software to download Blender and update it automatically. Here’s a little tip: I use Steam. I’m a heavy player, so I use Steam all the time.
- In Steam, search for Blender.
- Add it to your library. It’s free.
- Click to use it. Steam gives you the latest version of Blender. When I set it up, that was 4.3.2.
- When there is an update, Steam updates Blender automatically, just like a game.
So Steam is not only for playing, it’s also for studying and working. You can tell your boss that’s why Steam is installed on your computer: you’re going to work. Just kidding.
Why I don’t use a Magic Mouse
Using Blender, you need a good mouse. By good, I don’t mean the Magic Mouse. I’m on a Mac, and it comes with the Magic Mouse or a touchpad. But if you are really into 3D modelling, or even sculpting, don’t use it. It’s really, really inconvenient for serious design software. I prefer a good old mouse, a typical mouse. The difference between the Magic Mouse and this not-so-magical mouse is the wheel in the middle. You can press that wheel down to select things and move. It’s crucial.
If you want to work along, please get at least this kind of mouse. On the second-hand market it’s really cheap. You don’t need a high-end one, but you do need the physical, clickable wheel. I know the Magic Mouse is really useful. I use it all the time. You can use both at the same time; I do. When I do serious modelling, I just pick up the other one and switch.
With a Magic Mouse you can select, and you can pan a little with one finger. But some things need you to click the middle mouse button, and you can’t do that. There are a lot of workarounds, and technically you can map all of this onto your keyboard. I don’t recommend it. You get hassled pretty quickly, it’s not intuitive, and I don’t want to confuse you with a different system. Blender relies heavily on shortcuts. There are tons of them to master before you get really comfortable, and a completely different system with complex mappings and workarounds will cost you more time than everybody else. That can be discouraging.
The Screencast Keys add-on
One of Blender’s best-known features is that you can add a lot of plug-ins and extend it according to your needs. For my demonstrations, one is essential. Many things in Blender use the keyboard as well as the mouse, so I install an add-on that shows every key I press and every mouse click on the screen. That way you get accurate steps of how things are done.
It’s called Screencast Keys, and it lives on GitHub. If you have no programming background: GitHub is just a repository for storing open-source projects and code. Screencast Keys shows the keyboard and mouse operations and their status on the screen, so you can follow along better. And if you want to make your own videos, for example to record your creative process for an audience, you can install it too. I’m cool with that.
On the project’s GitHub page, go to the releases page. The latest release is at the top, and you can see all the other releases there too. Download the zip file.
Installing and using an add-on
- In Blender, go to Edit, then Preferences (not the File menu).
- Click Add-ons, then install from disk, and select the zip file you downloaded. It installs automatically.
- Search for Screencast Keys and tick the box to enable it. If you don’t tick it, it won’t work.
- Expand it to see all the options. You can enable it on startup, set the region, the shadow, the background, the sidebar and so on. There is an experimental section too. I turn on everything here.
- Back in the viewport, press N to open the sidebar. There is a Screencast Keys tab. Click it and turn it on.
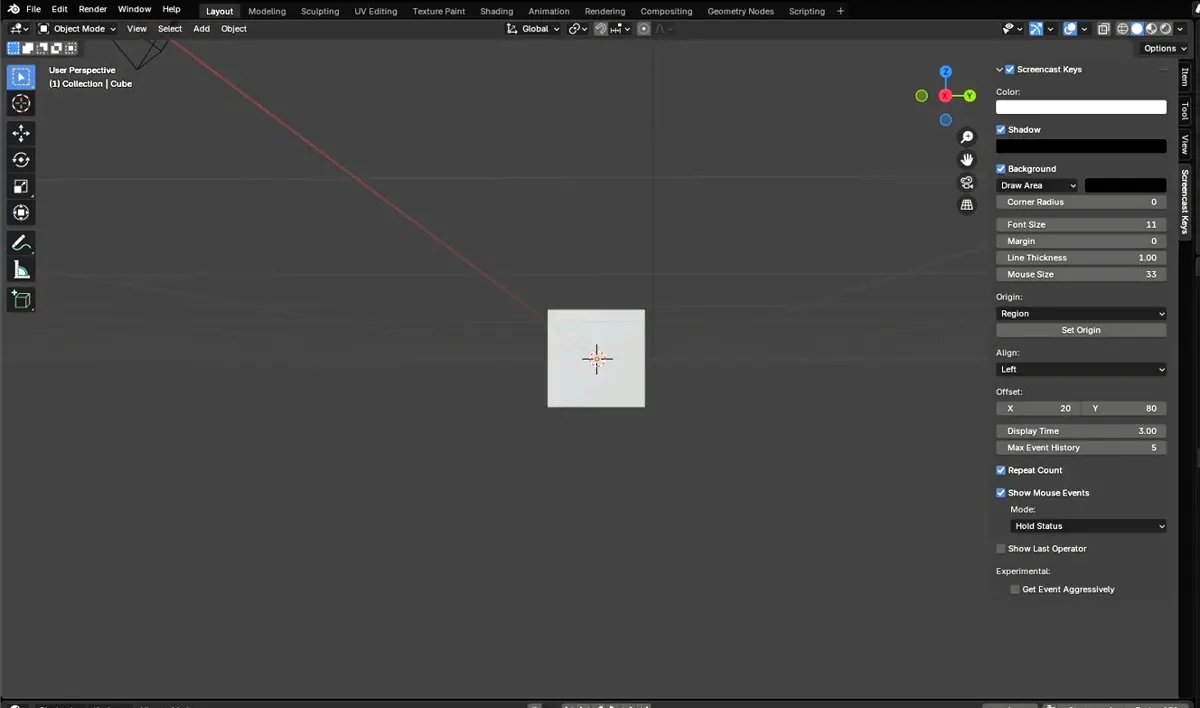
Now press something, like N, and you can see a small icon appear. Click the mouse and you can see that too. You can fine-tune it if it’s too small: make the font size bigger, the margin bigger, the line thickness and the mouse size bigger, until everything is easy to see.
By the way, I’m left-handed. I use the mouse with my left hand and I’ve flipped the buttons around, so I click with my index finger. If you’re right-handed, the click you see me make is your left button. It doesn’t really matter for you, because I’ve already adjusted it, but if you were curious, that’s why.
Uninstalling an add-on
Here is one thing that changed in a recent update. If you install add-ons like me, you end up with tons of them. Press N and you can see them all in the sidebar. Say you want to uninstall one of them, for example Screencast Keys. I’m using Blender 5.0.1 here.
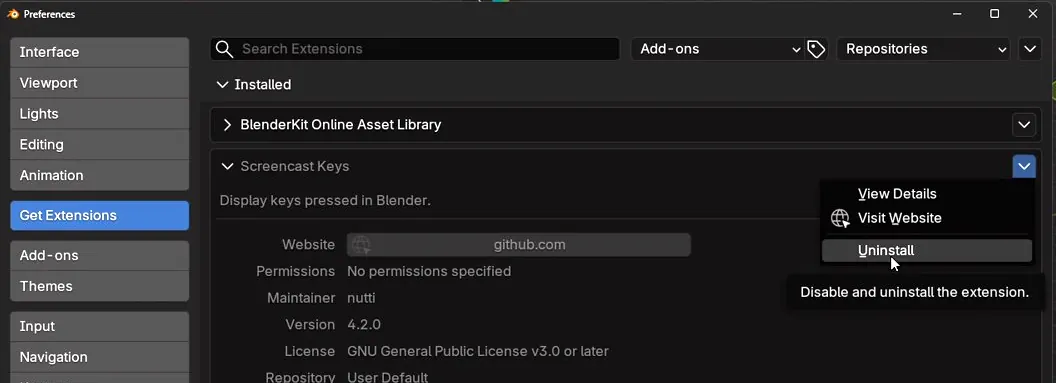
You would normally go to Edit, then Preferences, and Add-ons. Previously there was a delete, or uninstall, button there. But I think from the Blender 4.2 update you can’t find it there any more. And don’t go to the add-on’s file to uninstall it; that’s just too much.
- Go to Edit, then Preferences.
- Click the Get Extensions tab. The latest Blender has this tab, and your installed add-ons are listed there.
- Find the add-on, for example Screencast Keys, and open its menu with the small arrow on the right.
- Choose Uninstall.
Key takeaways
- Blender lets you set up studio lighting inside your computer at a very low budget. Use rendered preview to see light and shadow live, and move the light until you like it.
- Render a scene, save it to your phone or iPad, and draw from it with a pencil. You get amazing light settings to practise from.
- Drawing a cube or a cylinder with parallel edges is drawing from concept: an orthographic view. We draw in perspective, so learn from observation.
- In a cylinder, the ends are not the same. Cut it with loop cuts and you see that the ellipses change constantly, and an ellipse never has sharp sides.
- While you are learning, stick with one version of Blender from start to finish. Updates move options around, but most of the core functionality doesn’t change for a long time.
- For Blender, use a mouse with a clickable middle wheel, not a Magic Mouse. Blender relies heavily on shortcuts, and workarounds cost you time.
LIPAI WANG
A self-taught artist and teacher, known to his video students as William Jiamin. A former programmer, he teaches drawing, painting, pixel art and 3D the way he learned them: one solvable piece at a time.