Art Bootcamp Notes · 05 · Seeing accurately
One, Two and Three Point Perspective, Solved Like a Maths Problem
Draw one-, two- and three-point perspective by connecting dots: the box, the corner, hidden edges, and an auxiliary-point trick for a perfect cube.
 By LIPAI WANG · Chapter 5 of his book Art Is a Puzzle You Can Solve
Perspective is a topic I was stuck on for a long time. Recently I think I have got the hang of it, and once you get the hang of it, it is really easy. It is just simple mathematics: a way of solving a specific problem. If you stop treating perspective as an art problem and treat it as a mathematical problem, remember a few formulas, and connect the dots, you can do it.
Perspective comes in one-, two- and three-point versions. The name explains itself: they use one, two or three vanishing points. In this chapter I go through each in turn, all on paper with a pencil and a straight edge. The last section shows a trick with auxiliary points that finally gave me a hundred per cent success rate with three-point perspective, which is the hardest of the three.
One vanishing point
Why parallel lines look wrong
Suppose you draw a cube with every edge parallel to its partner: this edge parallel to that one, the back parallel to the front, even the edges you can’t see. That is an orthographic view. If you use Blender, you will know you can toggle between orthographic and perspective views. An orthographic view is good for design, but it is very bad for a final drawing, because it looks so unnatural. Draw everything parallel and you will normally get a really bad drawing, because you are not drawing in perspective.
In perspective, we have a specific point that we call the vanishing point. I label it VP.
Drawing a one-point box
- Draw the front face. Draw a square: these two lines parallel with each other, and those two parallel with each other. This square is the face pointing towards you. Call it face one.
- Mark a vanishing point. Put a dot somewhere on the paper and label it VP. In my demonstration it sits below and to the right of the square.
- Connect the corners to the VP. Don’t draw the back of the box, face two, as another parallel square. Instead, take the four corners of face one and connect each of them to the vanishing point with a ruler. Don’t press hard. These are ghost lines, light reference lines.
- Choose the depth. How far back you go depends on the shape you want. For a long shape, like a shipping container, go far back. For a short, narrow one, stop close to the front. Draw one line parallel to an edge of the front face, between two of the ghost lines. Where it crosses them gives you two new points. Be extremely careful about these two crossing points.
- Find the rest. Draw the next line parallel to its edge on the front face (the same direction, a different length, depending on the angle) and find where it crosses the ghost line. Mark a dot, and join the dots.
- Firm up the box. Press harder on the real edges so the box stands out from all the ghost lines. Add some shading so you can see the faces.
A note on tools: when you rule a line, move the ruler down a little to allow for the width of the line. And if you don’t have a ruler, use anything long, straight and hard enough. I used the cover of a book. I also drew a big dot for the vanishing point only so you could see it clearly; normally you don’t need to.
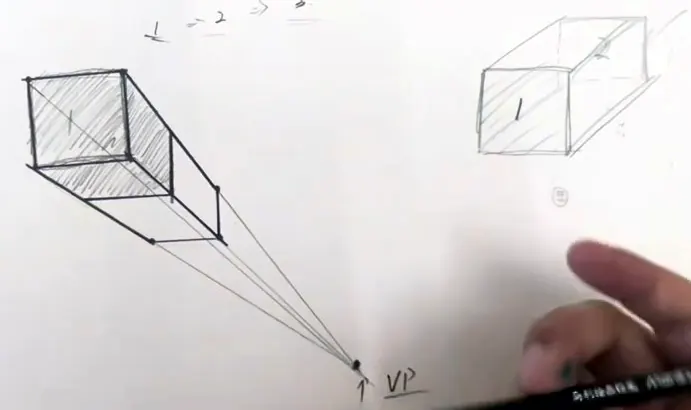
If the box is too long, you can shorten it: make a cut nearer the front, draw a new edge parallel to the front face, and ignore the old back. Now look at the result with a ruler. The edges of the front face are parallel. But the edges going back are not parallel. In fact, they are not only not parallel: they all cross at that far-away point, the vanishing point.
You can use this for a box, a container, maybe a skyscraper. When I draw skyscrapers from a bird’s-eye view I might use one vanishing point, with all the towers running towards one point in the centre. You might do that for a fantasy cyberpunk illustration. But normally I use three vanishing points for skyscrapers, because that gives you a really classic layout.
Try it. Draw a square, put a vanishing point off to one side, and connect the four corners to it with light lines. Choose a depth, find the crossings, and finish the box. Then shorten it by cutting it nearer the front.
Two vanishing points
Two vanishing points are a little more complex. The way I remember it: two-point perspective is the technique you use when you want to draw a corner.
- Draw the corner line first. This is your centre line. It doesn’t have to be in the centre of the page. And the parts above and below don’t have to be the same length. In my demonstration I made it much taller above.
- Place two vanishing points, one to the left and one to the right.
- Connect the dots. Ghost lines from the top and bottom of the corner line to each vanishing point, with a ruler or whatever tool you have. With two vanishing points, only the vertical lines stay parallel with each other. In one-point perspective we had a whole face whose edges were parallel; here, only the verticals are.
- Choose how far the shape goes. I wanted a wall turning a corner, so I made one side go further away. You can even run a side all the way to its vanishing point and make it part of the structure, a really, really long wall. Draw vertical lines where you want the ends to be. These three verticals are parallel with each other, and every other line goes to a vanishing point.
- Confirm the lines. Once you are sure of the points, press harder on the edges you want.
You can add shading to show the turn of the corner. That depends on how sharp the turn is. A sharp turn gives a narrow edge; when you render, you can make the turn rounder.
Drawing from the unknown
You can also draw the parts behind, the edges you can’t see. I call this drawing from the unknown. When I checked the internet, most references for this put the two vanishing points way up or way down. I couldn’t find one drawn at the centre (maybe my searching wasn’t good enough), so that is why I use the centre as my example.
To draw from the unknown, you connect the dots, crossing over from one side to the other:
- Take the far end of the right-hand side and connect it to the left vanishing point. I use a dotted line for this. It is a really long line.
- Take the far end of the left-hand side and connect it to the right vanishing point.
- Where these two lines cross is the hidden back corner. Mark it. If you can’t see the crossing clearly with dotted lines, use a ghost line instead.
- Join that hidden corner to the ends of the visible sides. These are the edges you can’t see, but you draw them anyway.
- Do the same for the top and the bottom.
It is confusing, I know. Just bear with it.
When it goes wrong
Now, I’m going to be completely honest with you: I made a mistake here. I found the crossing point for the hidden corner, but the line through it should have been parallel with the other vertical lines, and it wasn’t. So there had to be a mistake somewhere. I was confident about one of the two points, because if I connected the two, it just wouldn’t work unless the shape was some weird shape. So I decided the other crossing was the wrong one, eyeballed where it should be, and moved it.
This is a mistake I often make, especially when I’m drawing traditionally instead of digitally: eyeballing things with a ruler and pencil introduces differences. You have to adjust for them using the knowledge you have. When something is wrong, use logic to change it. Don’t be afraid of making mistakes. That is exactly when we use the eraser.
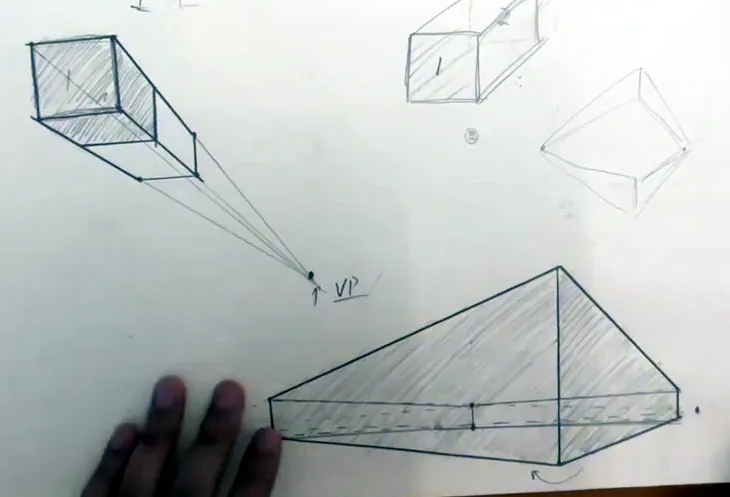
Once the main shape is done, erase the construction points and it instantly looks better. I imagined this one as a street, or a small shopping mall seen from above, where you might add a door to walk in and shop. I have also recently learned that you should shade in straight lines using a different grip from your normal writing grip. We will talk more about shading later. I’m still learning it.
I chose a difficult version on purpose, with very long sides. To make it easier, keep the sides shorter. You get much more angle, the parts are easier to tell apart, and the crossings are easier to find. With a drastic angle it is very easy to make a mistake, so you have to check.
Try it. Draw a corner line anywhere on your page, with a vanishing point on each side. Build a wall turning the corner, then find the hidden back corner by connecting each far end to the opposite vanishing point. Check that the hidden vertical is parallel with the others, and correct it if it isn’t.
Three vanishing points
Three vanishing points are rather difficult if you don’t know the trick. Once you know it, it may even be easier than two. The trick: set the vanishing points first, then the object. Don’t eyeball the object and then try to add vanishing points to fit it. That won’t do.
- Place three vanishing points. In my demonstration, two sit to the left and right near the top of the page, and the third is far below, between them.
- Connect the two vanishing points to each other.
- Draw a centre line from the third vanishing point. It doesn’t need to be perfect, but you need it.
- Draw some lines from the third vanishing point. We haven’t decided the shape yet, so the angles don’t matter much. Draw a line on each side of the centre line. You can eyeball this.
- Choose one point on the centre line. Now you need just one point to settle everything; everything else follows. For a skyscraper you would make it long, but if it is too long the angle becomes too drastic and hard to draw, so I’m doing a shorter version. This point is the bottom of the object.
- Connect it to the left and right vanishing points. Where those lines cross the side lines you drew in step 4, you have two more points. These two lines are the bottom of the object.
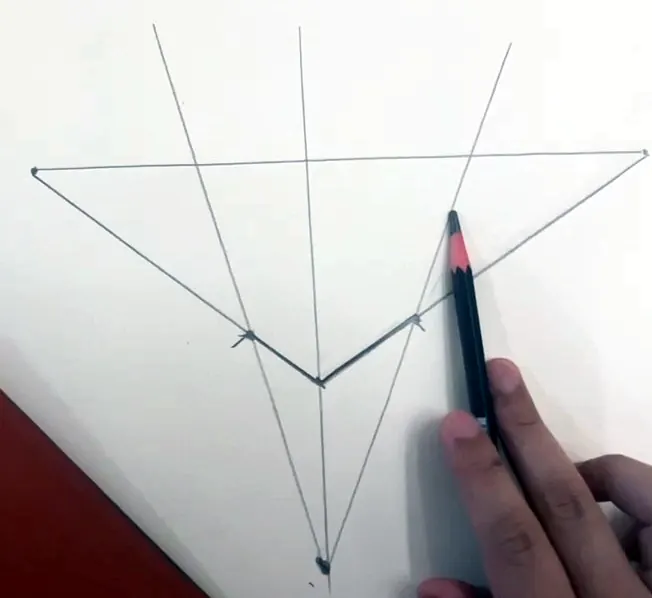
- Go up the side lines. Follow the side lines upwards. You don’t know yet where to stop, so set a point at whatever height you want: higher for a taller object, lower for a shorter one.
- Use the centre line. From each new point, draw a line to the opposite vanishing point, one from the left and one from the right. Every point has to go to all three vanishing points. These two lines should hit the centre line at the same point. Fingers crossed, they cross the centre line together. There may be some discrepancy, and that’s okay; I’m not going to make it perfect. On a computer you get much more accurate reference lines.
- Connect the dots and finish the outline.
It might look like a complex process, but remember we are doing this on a piece of paper. Digitally it is much easier, because you have all sorts of referencing tools. I didn’t even have a ruler; I used a book cover, and it still worked fine.
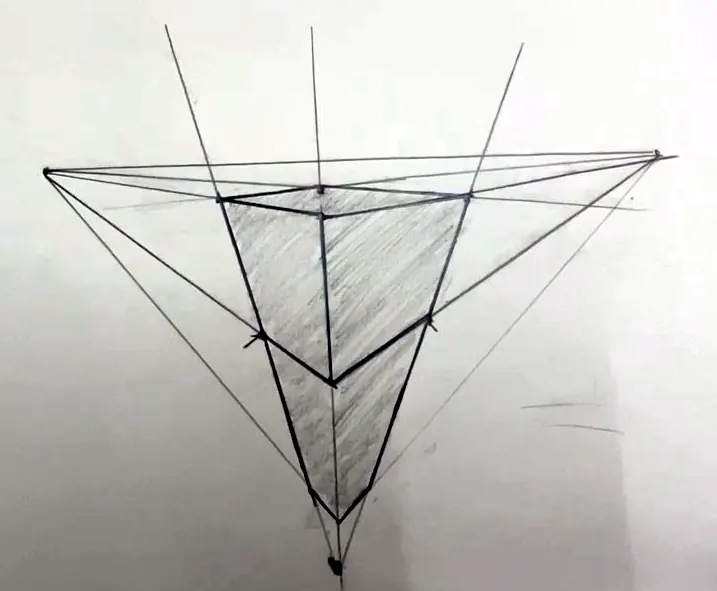
If you want a really tall skyscraper, make it go further down. You won’t draw a parallel line for the extra height; you already have a vanishing point down there, so use it as your reference. Find the new crossing, connect it to the vanishing point, and keep going. On the right side, follow the lines to the left vanishing point; on the left side, follow them to the right vanishing point. You can treat it as separate parts, right part and left part, but each point has to conform to all three vanishing points at once. It gives your drawing a really drastic, outstanding feeling. Picture a superhero standing on top of the skyscraper, ready to jump down.
When you have finished, erase the construction lines, or, if you are working in layers, hide the layer below.
If you want the object wider, open up the two side lines a little, find the new crossings with the vanishing points’ reference lines, and connect them, adding more reference lines just as before.
I struggled with three points. I failed at my first and second attempts, and it really is hard. But my recommendation is to do it manually at least once in your life. Once you have done it, it’s like riding a bicycle: you never forget. It’s really helpful for the future of your art career.
Try it. Place three vanishing points first, two near the top of your page and one below. Draw the centre line, choose one point on it, and build the object by connecting dots. Then extend it further down to make it a tall tower.
Three vanishing points with auxiliary points
I practised three-point perspective a lot and failed many times. Part of the reason was this: after placing the third vanishing point, I drew the lines to the left and right at random. I was just eyeballing them, because the actual depth of the building or object wasn’t set.
If you want to draw a perfect cube, here is a method I found that works with just one ruler. It’s like a little secret. I searched the internet for more explanations of this technique and didn’t find any, so it feels like a lost art. Maybe drawing itself will become a lost art, with artificial intelligence, who knows? But we are going to learn the rule in order to break it.
The trick is to find the centre points.
Setting up the auxiliary points
- Place VP1 and VP2 and measure the distance between them with the ruler. I went from 1 to 13 on my ruler. I didn’t go as big as possible this time; pick a length your ruler can measure and whose centre you can find.
- Find the centre. Halfway, at 6.5, is your first helper point. I call it an auxiliary point: a helper point that helps you measure the points that matter in your drawing. Label it AVP3.
- Draw a line down from the centre, perpendicular to the line joining VP1 and VP2. VP3 goes on this line.
- Place VP3 with the ruler and find the centre of each side. Measure from VP1 at the top down to the perpendicular line, and choose a length that fits your ruler, so that you can find its centre: 12 gives you a centre at 6; if you want it less drastic, 10 gives you 5. If the point is too far away, you can’t find the centre on your ruler. I wanted this drawing as drastic as possible, so I went for 12. Where that length meets the line is VP3, and the centre of the side is AVP1. Do the same from VP2 on the other side for AVP2.
- Check. If you measured correctly, it should be like an equilateral triangle. Connect AVP1 and AVP2: the line should be parallel with the line joining VP1 and VP2.
So we have three vanishing points, nothing too fancy, plus three helper points that help you draw better. Once this is set up, you can draw anywhere on it. It doesn’t really matter where.
Building the cube
- Set the height. Draw a line coming up from VP3, and choose two places on it. That gives you the height of the cube.
- Connect to VP1 and VP2. Every point should connect to three vanishing points. These two points already connect to VP3, so connect each of them to VP1 and VP2 as well.
- Find the depth with the auxiliary points. You still don’t know how deep the cube goes. But you have two points you are sure of, the ones you chose at the start. Connect the top point to AVP1 and to AVP2. Each of those lines crosses one of the lines you already have. These crossings set the depth. You still don’t have the left and right corners; connecting the new points in step 4 gives you those.
- Check every new point. Every time you find a new crossing, check whether it is connected to all three vanishing points. For example, this point conforms to VP1, but not to VP2 or VP3. So what do you do? Simple: connect the missing ones. Every new line gives you a new crossing, new information about the drawing. You don’t always need to connect every dot; as long as you connect some of them, more information comes up. Just go with the flow.
- Strengthen the cube. When everything is found, press hard on the cube’s edges. You can erase the construction lines or leave them for reference. I shaded the faces to point out the surfaces of the object of interest.
It is step-by-step solving, like a mathematical problem. Sometimes even I get confused about which point to connect; I only learned this trick a few days before recording it.
If your drawing is small, it can give you a lot of messy lines. Once you get the hang of the technique, you can scale it up, or use drawing tools.
To recap: find the centre point between two vanishing points; the halves are the same, and it forms a kind of equilateral triangle. Connect the centres and use them as help lines. When you have a line but don’t know how deep it goes, connect the top point to the auxiliary vanishing points, and the crossings give you the depth of the object.
A second, quicker cube
Let me do a quick practice, a bit lower and to the right, to show that the technique works anywhere. This is also a very good way to practise, because you can draw a large set of reference lines and put multiple objects on it.
I set up the points again: 13 between VP1 and VP2, so the centre is 6.5; a perpendicular line; about 12 down each side, so the centres are at 6. Then I drew a line, with a start point and an end point. This time I drew it taller, because sometimes you don’t know how big the object will be. You think it will be this big, and in fact it is this big. It’s a mystery you solve one step at a time.
I connected both points to VP1 and VP2, then connected the top point to the two auxiliary points to get two crossings. One new point conformed to two vanishing points but not to the third, so I connected it, letting the line fly all the way up, and got more crossings, more information. The cube came out much bigger than I expected, with a really drastic stretch. I kind of like it.
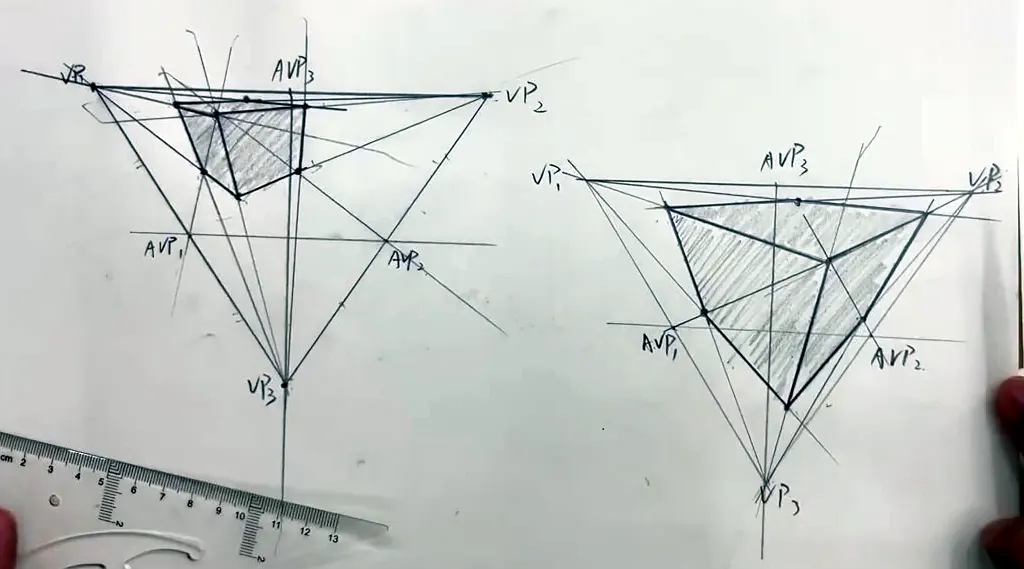
Try it. Set up VP1, VP2 and VP3 with a ruler and mark the three auxiliary points at the centres. Draw a cube by choosing its height on a line from VP3, connecting the top point to AVP1 and AVP2, and checking every new point against all three vanishing points. Then draw a second cube elsewhere on the same set-up.
Key takeaways
- Treat perspective as a mathematical problem: connect the dots and find the crossings.
- Drawing every edge parallel is an orthographic view. It is good for design but looks unnatural in a final drawing; in perspective, the receding edges cross at a vanishing point.
- Two-point perspective is the technique for drawing a corner. To draw the hidden edges, connect each far end to the opposite vanishing point.
- When a constructed point is clearly wrong, use logic and the eraser to fix it. Don’t be afraid of mistakes.
- With three vanishing points, set the vanishing points first and then the object; never eyeball the object and then add vanishing points.
- For a cube in three-point perspective, find auxiliary points at the centres between the vanishing points and connect the top point to them to fix the depth.
LIPAI WANG
A self-taught artist and teacher, known to his video students as William Jiamin. A former programmer, he teaches drawing, painting, pixel art and 3D the way he learned them: one solvable piece at a time.